sabato 27 febbraio 2016

Coloritura di una stampa embossata in bianco con i Brusho / Coloring a white embossed print with Brusho: video tutorial

A quanto pare il 2016 è l'anno delle novità... Questa è la volta dei video con audio e sottotitoli.
Dopo svariati balbettamenti e tentativi di emulare la mitica Jennifer McGuire (lasciatemi l'illusione che prima di arrivare al video tutorial perfetto abbia registrato centinaia -ma che dico!- migliaia di tracce audio), sono giunta alla conclusione che ho i miei limiti e devo sapermi accontentare dei risultati. Magari il tempo e la pratica miglioreranno il mio stile, ma... per ora direi che può andare.
Di sicuro devo ammettere che il video editing mi ha aperto un nuovo mondo.
L'occasione per inaugurare il tutto è quella di un video in cui vi mostro come realizzare una card acquerellata coi Brusho. L'effetto visivo dei pigmenti in azione è troppo avvincente per ridurlo agli scatti della macchina fotografica.
Apparently the 2016 is the year of the news... this is the time for videos with audio and subtitles.
After some unsuccessful attempts to imitate the legendary Jennifer McGuire (let me the illusion that she recorded hundred -what I'm saying!- thousands of audio traces before the perfect video tutorial), I realized that I have limits and I must accept my first results as they are. Maybe time and practice will improve my style, but... I can't complain.
The inauguration video is about a watercolored card with Brusho. The visual effect of these pigments at work is too much compelling to reduce it to some shots.

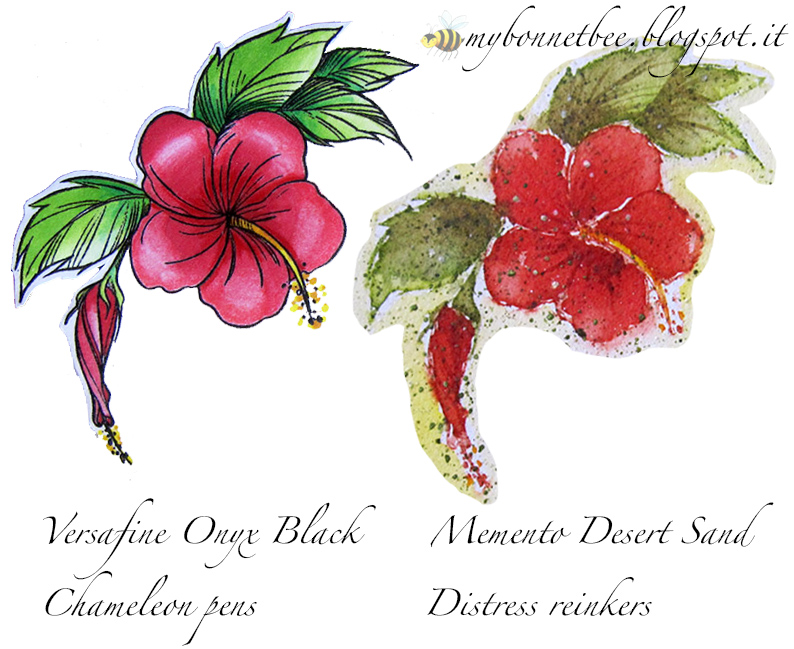
Le carte di partenza (su cui ho stampato in Versamark ed embossato con la polvere bianca) sono state diverse (nessuna specifica per acquerelli): a sinistra la Malmero Perlè, a destra la carta So Jeans. In entrambi i casi l'effetto bagnato sembra un vero pasticcio...
The card stocks I used (where I printed my stamp using Versamark pad and white embossing powder) were different (and they were not specific for watercoloring): Malmero Perlè on the left and So Jeans on the right. In both cases the wet effect seams really a mess...

Ma da asciutti i colori sono meravigliosi, non trovate?
But the dry effect is quite cool, don't you agree?

BrusHO: Yellow, Purple, Leaf Green.

BrusHO: Yellow, Brilliant Red, Leaf Green.


BrusHO: Yellow, Turquoise, Ultramarine, Leaf Green.

Devo dire che mi sembrava delittuoso il pensiero di montare queste piccole meraviglie su un cartoncino... Alla fine ho deciso per un biglietto minimal, per non intaccare minimamente l'effetto di questi colori.
Using those little masterpieces for some cards seemed cruel to me... At the end I chose a minimal card style, without altering the effects of the colors. 


L'operazione è davvero semplicissima e divertente. Un'esperienza che vi consiglio e che ripeterò presto!
E se volete provarli dal vivo, venite a seguire il mio corso il 9 aprile da Impronte d'Autore a Milano.
This was a very quick and fun experience! I'll do it again soon.


Timbri / Stamps: Ranunculus Field Stamp, enjoy, Alfabetini Spumoni minuscolo.

martedì 23 febbraio 2016

Brusho in ordine / Brusho storage: tutorial

Da quando i Brusho sono entrati nella mia vita, non riesco più a farne a meno. Se amate gli acquerelli, questi pigmenti dai colori vibranti e dagli effetti imprevedibili vi daranno tante soddisfazioni (cercate i video su Youtube, vedrete meraviglie).
Unico neo, è la confezione. Trattandosi di pigmenti in polvere, ne basta una quantità davvero piccola per ottenere una buona colorazione, quindi è sconsigliabile prelevare il prodotto direttamente dal barattolo, in quanto troppo volatile. La soluzione più pratica adottata dalle altre stampers è quella di praticare uno o più fori direttamente nel tappo, applicare dei cerchietti di carta colorata per distinguerli in modo immediato e usare i barattoli come salini (eventualmente tappando i buchi con delle puntine quando non in uso).
Ok: è una soluzione più pratica e meno rischiosa che lavorare con tutto il barattolo aperto. Ma se devo trasportarli? (vedi lavoretti coi bambini in classe, giornata di pasticci con le amiche, corsi a domicilio...). Troppe volte ho assistito ai cappottamenti dei barattolini sul banco demo in fiera...
Ecco come mi è venuta questa idea per conservarli e utilizzarli al meglio (complice anche il papà che di lavoro fa bottiglie di plastica :)
Since Brusho have entered my life, I can't live without them. If you love watercolors, these vibrant and unpredictable pigments will not let you down (check on Youtube, you'll see wonders).
The only glitch is the packaging. Because the powder is very concentrate and the cap too much wide, the stampers usually make one or few holes on the cap and use the small jar as a salt dispenser (sometimes adding a pin into the holes when they stock the jars).
Ok: this is better than working with an open jar... but what about moving them then? (like when you're in a classroom full of kids, or into a messing meeting with friends, or in a workshop at home...) I have watched the overturning of these jars during a fair demonstration for too many times...
That's how this stocking idea popped into my mind (with a little help from my dad, who makes plastic bottles for living :)

 Cosa vi occorre:

1) barattolini di Brusho (ovviamente)
2) bottigliette con tappo contagocce (non occorre il mio papà, le potete trovare anche su Amazon :)
3) strisce o etichette di carta adesiva bianca
4) cucchiaino o palettina
5) piattino o tavolozza bianca
6) pennello
7) acqua pulita
8) tovagliolo di carta pulito
9) foglio di carta raccogli-polvere
10) penna gel bianca

Here what you need:

1) Brusho (of course)
2) little bottles with dropper cap (you don't need my dad, you can find them on Amazon :)
3) strips of white adhesive paper
4) tea spoon or a flat stick
5) white dish or palette
6) brush
7) clean water
8) clean paper napkin
9) paper sheet powder-catcher
10) white gel pen

Per prima cosa etichettate tutte le bottigliette: sovrapponendo le estremità della striscia, l'adesione sarà più duratura.
Per esperienza personale, vi sconsiglio di colorare la striscia di carta prima di incollarla alla bottiglia, perché la carta adesiva è molto sottile e rischiate di far comparire delle antiestetiche grinze e di strapparla nel tentativo di riposizionamento. Altro discorso se utilizzate della carta per acquerello e la incollate usando del biadesivo.
First: label all the bottles (if you overlay the borders of the paper strips, they'll stick better and longer). By personal experience, I suggest you to color the strip after attach it on the bottle, because the paper is too much thin and, when it's wet, it can break up easily. Or you can use a watercolor paper and glue it onto the bottle.

Aprite il vasetto di colore e con il retro del cucchiaino o una palettina, prelevate la quantità di pigmento che desiderate trasferire e, con molta calma e mano ferma, travasatelo nella bottiglietta.
Niente panico se le prime volte ne rovesciate una parte in giro, o se vi scappa uno starnuto: il foglio di carta sotto le bottigliette serve proprio a questo! (ricordate di pulirlo o cambiarlo prima di travasare il nuovo colore).
Una raccomandazione: prima di trasferire il colore successivo, pulite perfettamente il cucchiaino, bagnandolo con l'acqua e passandolo più volte sul tovagliolo. Basterebbe un granello per contaminare il nuovo colore...
Open the Brusho little jar, pick a small quantity of pigment with the spoon handle, and put it in the bottle with a calm and firm hand. If you spill some pigment or sneeze, do not panic! The paper sheet under the bootle will help you. (Remember to clean or change it before pouring the new color. Also, clean perfectly the spoon handle with water: a single grain can contaminate the new color). 

Inserite la punta contagocce sulla bottiglietta e rovesciate qualche granello sulla tavolozza.
Put the dropper cap on the bottle and spill few grains on the palette.

Col pennello mescolate un po' d'acqua ai granuli (vedrete che meraviglia!).
With the brush add some water to the grains (and be amazed!)

Colorate la striscia adesiva sulla bottiglietta con poche pennellate, per evitare di inzupparla troppo.
Non preoccupatevi delle sbavature, le pulirete a striscia asciutta.
Color the label on the bottle with few strokes. Don't worry about the smears, you'll clean them when the label will dry up. 

Allineate la bottiglietta pronta sul barattolo corrispondente, in modo da non confondere i vari colori. Quindi procedete con gli altri barattolini.
Put the bottle on the original jar, so you will not mix up the colors. Then pass to the next one.

Una volta asciutte tutte le etichette, completate il lavoro segnando i nomi dei vari colori con la penna gel bianca (ed eventualmente una nera per i colori più chiari).
When all the labels are dry, complete the job writing the name colors with the white gel pen (and a black one for the light tones).

A questo punto le vostre bottigliette sono pronte per essere conservate al riparo dall'umidità e da accidentali rovesciamenti. Io ho trovato questa scatola portatè perfetta per questo scopo.
The Brusho are ready to be stocked and protect from humidity and accidentally overturn. I found this tea box: perfect form them.

Il procedimento può sembrare lungo e laborioso, e di sicuro richiede un po' di pazienza e attenzione per evitare di fare pasticci e spargere polvere colorata ovunque. Però vi assicuro che i colori così preparati vi dureranno tantissimo e non correrete il rischio di trovare pigmenti sparsi nella borsetta!
The proceeding requires patience and attention, and may seems long and hard working, but I guarantee that your well prepared Brusho will last for long and you'll not risk to find some pigments strewn in the purse!

PS: a Milano, Genova e on line potete trovare i Brusho in vendita nel negozio di Impronte d'Autore.

venerdì 19 febbraio 2016

Fascia elastica floreale / Elastic crocheted floral band

E' davvero da un sacco di tempo che non pubblico un post a tema uncinetto.
It's been a long time since my last post about a crocheted project.

Che ne dite di un progetto primaverile?
Il fiore è realizzato seguendo il bellissimo modello di Olavas Verden.
Ho aggiunto un bordino all'elastico della fascia, giusto per richiamare il colore del fiore e dare un po' di colore anche al resto del capo.
What about a springy one then?
I went through the beautiful Olavas Verden's flower tutorial, then I added a crocheted edge to the elastic band.

Modella d'eccezione la mia Agata, che ci ha preso parecchio gusto...
My model is my 7 years old daughter Agata, she really enjoyed it...


Modificando le dimensioni del fiore e la lunghezza dell'elastico, il modello si presta benissimo anche per una neonata.
This project suits also a newborn girl: you have just to arrange the measure of the elastic band and the diameter of the flower.


Perfetto per colorare queste giornate fredde, non trovate?
It is perfect to color these chilly days, don't you think?

lunedì 15 febbraio 2016

Sono nel Nuovo DT Chameleon! / I'm in the New Chameleon DT!

Non vedevo l'ora di annunciarvi questa novità: da quest'anno faccio parte del Design Team dei Chameleon Pens!
Per me è un grandissimo onore, anche perchè adoro questi pennarelli e mi ci diverto un sacco!
I couldn't wait to announce you this new: I'm in the New Chameleon Pens Design Team!
It's a big honor for me, I love these pens and I have so much fun with them!

Questo è uno dei progetti che ho presentato per la selezione. Per il tutorial sulla colorazione del colibrì, guardate il post sul blog Chameleon.
E naturalmente continuate a seguirmi per vedere i prossimi progetti con questi fantastici pennarelli!
This is one of the projects I submitted for the DT selection. You can find the coloring tutorial on the Chameleon blog.
And keep following my blog to see the future projects with these fantastic pens!!


venerdì 12 febbraio 2016

Card di S.Valentino 3D / 3D Valentine card

Che emozione! Il post di oggi ha come protagonista una card che ha l'onore di essere ospite sul blog Chameleon!
 troverete le istruzioni passo passo per realizzarla, utilizzando la tecnica del paper piecing 3D (se non avete idea di cosa si tratti, il dettagliatissimo post di Mariska van der Veer con video annesso vi chiarirà le idee).
How exciting! Thanks to the valentine card I present you today, I'm a guest designer on Chameleon pens blog!
At that address you can find the step by step instructions to make it with the 3D paper piecing technique (if you have no idea what I'm talking about, you can watch the detailed Mariska van der Veer's tutorial).

Il progetto è un po' laborioso, ma ne è valsa la pena, non credete?
Cosa non si farebbe per amore!
This is a project that takes a loot of time and energy but it's really worth it, don't you agree?
Everything for love! : )

martedì 9 febbraio 2016

Busto Arsizio: Passatempi e Passioni (primavera 2016)

Prima rassegna fieristica della stagione. Qualche scatto per chi non ha avuto la possibilità di visitarla...
First reportage of the fair season: enjoy some shots.


mercoledì 3 febbraio 2016

Card con hibiscus acquerellato / Watercoloured Hibiscus card

Restando in tema acquerello, oggi voglio mostrarvi una card che ha come protagonista un bellissimo hibiscus. Lo avevate già visto in questo post, dove vi avevo preannunciato che avrei fatto una card usando lo stesso timbro, ma cambiando completamente genere.
Speaking again of watercolour, today I like to show you a card with a beautiful Hibiscus. You saw it  already in this post, where I introduced a card with the same stamp, but a different technique.

Ho scelto di usare la tecnica di stampa "no lines", usando un tampone chiarissimo (il Memento Desert Sand). Ho trovato preziosissimo questo tutorial dell'artista Micheline Jourdain: è bravissima ad integrare lo stamping nei suoi lavori ad acquerello!
I chose to use the "no line" stamping technique, with a light ink pad (Memento Desert Sand). I found really helpful this Micheline Jourdain's tutorial: she is awesome to mix stamping and watercolouring!

Per la coloritura ho utilizzato soprattutto le ricariche dei Distress, ed infine ho spruzzato un po' di verde usando il colore "Sprays!" Artichoke e dell'acrilico bianco (forse mi sono lasciata prendere la mano ; ).
To colour the flower, I used mostly the Distress reinkers, adding a bit of "Sprays!" Artichoke and some acrylic white (maybe I was too generous ; ).

In questa immagine vi ho messo a confronto le due tecniche, così diverse, ma che amo allo stesso modo.
In this picture I compared both techniques: so different, but I love them at the same way.

Timbri / Stamps: 788-S ibiscus, sentiment: Whiff of Joy.

LinkWithin

Related Posts Plugin for WordPress, Blogger...