Visualizzazione post con etichetta The Happy Place. Mostra tutti i post

giovedì 24 novembre 2022

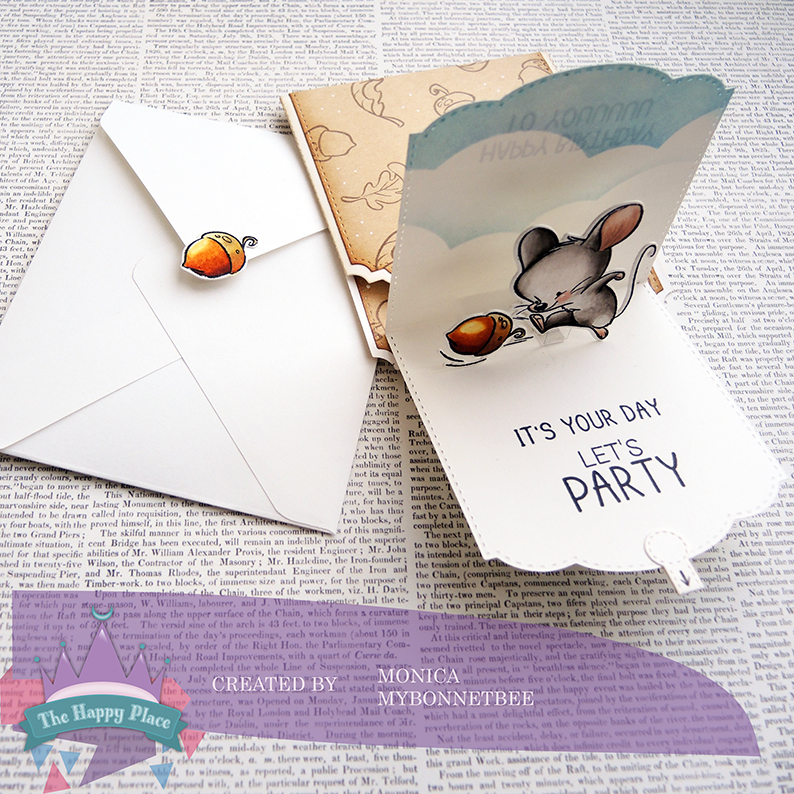
Giocando con una ghianda / Playing with an acorn

Anche se siamo già con la testa al Natale, oggi per il mio post promozionale del negozio The Happy Place voglio proporvi una card in tema autunnale, adatta anche ai maschietti.
I know that we are focused on Christmas, but today I like to share a masculine Autumn card with the supplies from The Happy Place. 

Il protagonista è un tenero topino che calcia la ghianda e il meccanismo de La Coppia Creativa è perfetto per un effetto sorpresa!

Inside the card this sweet mouse is playing with his acorn : the inner die by La Coppia Creativa is perfect for the surprise effect!

La card chiusa è decorata con una carta patterned creata con i timbri dello stesso set e dal set Enchanted Forest, stampati con un tampone marrone.
The outside of the card is decorated with a patterned paper I made by stamping the elements of the same stamp set anche Enchanted Forest set with a brown ink pad.

Al momento alcuni prodotti sono terminati sul sito del negozio, ma basta che scriviate ad Alessia per ordinarli dal suo The Happy Place :)
At the time the supplies I used are out of stock, but you can write to Alessia of The Happy Place and order them :)


Timbri / Stamps: Mice & Sport (Impronte d'Autore), Enchanted Forest (Impronte d'Autore), Party Time ENG (Impronte d'Autore)
Fustelle / Dies: Slimline Pocket (La Coppia Creativa), Mice & Sport (Impronte d'Autore), 
Colorazione / Coloring: Zig Clean Colors Real Brush, Distress Ink

venerdì 14 ottobre 2022

Lapidi sulla tavola / Tombstones on table

Ormai avrete capito che Halloween è una ricorrenza che mi piace un sacco, perché mi permette di esprimere liberamente il mio lato dark. E quest'oggi lo faccio grazie ai prodotti del negozio The Happy Place, che sponsorizza questo post.
I'm sure at this point you know my passion for Halloween: it lets me express my dark side freely. Today I like to share with you a project sponsored by The Happy Place shop.
 
Il prodotto che ho scelto per questo mese è lo stampo di Finnabair Wings & Bones e ho pensato di utilizzarlo per creare delle lapidi segnaposto per la cena di Halloween.
The product I chose from the stock is the Wings & Bones mould by Finnabair and I made some table name holders.

Come materiale da inserire nello stampo ho scelto la porcellana fredda, che è leggera e resistente e si presta bene ad essere colorata o semplicemente sfumata, come nel mio caso.
I used cold porcelain inside the mould: it's light and easy to color, perfect for cardmaking and mixed media.

Per prima cosa vi serve la forma di base su cui lavorare: potete usare un cartoncino pesante, un cartone vegetale o semplicemente sovrapporre più cartoncini tagliati in forma per creare maggiore spessore. In calce al post vi allego lo schema che potete stampare e usare come dima per replicare il progetto. Per avere l'appoggio retrostante vi basterà tagliare un trapezio allungato (fate le prove prima di incollarlo perché la lapide non sia sbilanciata).
The first step is to cut the base: you can use heavy card stock or glue some layers of paper to obtain a thick base (please, feel free to use the pattern I add below). As far as the stand is concerned, you can cut small slender trapezoids: be sure the tombstones will balanced before glue them to the card stock.

Colorate il cartoncino di base con il gesso nero o l'acrilico. Lasciate asciugare e, se vi piace l'effetto, ricopritela con una pasta grezza che simuli il cemento (nel mio caso la Crypt Grit Paste) e lasciare asciugare.
Color the card stock by using black chalk or acrylic paint. Let it dry and, if you like the effect, cover the piece with a concrete paste (I used the Crypt Grit Paste), and let it dry.

Per scrivere i nomi sulle lapidi ho fustellato due volte le lettere da un cartoncino grigio usando la fustella Alfabeto (88232) di Impronte d'Autore, incollandole con la Nuvo Deluxe. Quindi ne ho sfumato i bordi con il Distress Pumice Stone per renderli più tridimensionali.
I used the Alphabet die Alfabeto (88232) by Impronte d'Autore to write the names on the tombstones: I glued two letters each by using the Nuvo Deluxe Adhesive. Then I blended the edges with Pumice Stone Distress pad to add dimension.


Con lo stesso tampone sfumate sui bordi anche i teschi e le ossa ricavate dallo stampo. Per le parti incavate, come orbite e narici, potete usare un pigmento in polvere o semplicemente dell'ombretto nero.
You can use the same color to blend the edges of skulls and bones; for the inner parts you can use black pigments or an eye shadow.

Se avete in programma una cena a tema questi segnaposto non lasceranno indifferenti i vostri ospiti! Lavorando in serie il lavoro si velocizza: i tempi più lunghi sono quelli di asciugatura.
If you are scheduling an Halloween dinner, these table name holders will not leave your guests untouched!
Working in series can save time: drying is the most time consuming step.


Buon divertimento! ^__^
Have fun! ^__^


venerdì 29 luglio 2022

Dondolando tra le onde / Rocking on the waves

Non so voi, ma con queste temperature tropicali io vorrei passare le giornate in mare, come questi simpatici maialotti che ho scelto per il post mensile sponsorizzato da The Happy Place Shop.
In these super hot days I wish to spend my time at the sea, like these funny chubby pigs I chose for the monthly post sponsored by The Happy Place Shop.

Il modello è quello della rocker card, uno dei miei preferiti, perché fa un sacco di scena e non è particolarmente complicato da realizzare.
I chose the rocker card model, one of my fave, because it makes a beautiful scene and it's not so complicate to make.

Oltre a fare bella mostra sulla scrivania, la card si può appiattire per essere comodamente spedita in una busta.
You can put the card opened on your desk or you can easily flat it and send it inside an envelope.

Ecco qui tutti gli elementi del set al completo. Per la mia card ho aggiunto un maialino sulla barca da un set di una release precedente, che però calza a pennello con questa nuova. Non sono adorabili? ^_^ 
Here there are all the elements of the stamp set. In my card I added a pig from a previous release that fits very well in the boat.
Aren't they adorable? ^_^

Timbri / Stamps: YUZU-005 Pig Time Fun (MFT), BB-35 Hog Heaven (MFT)
Fustelle / Dies: MFT-1006 Icebergs, MFT-1541 Cloud Outlines, Bordo Onde
Colorazione / Coloring: Zig Clean Color Real Brush
Carta / Paper: Canson Aquarelle

sabato 11 giugno 2022

Una tag fiorita/ A flowery tag

Per il post di oggi in collaborazione con The Happy Place ho deciso di realizzare un progetto con i prodotti de La Coppia Creativa.
Today project is a collaboration with The Happy Place Shop. I made use of products by an Italian brand: La Coppia Creativa.

La nuova release di timbri è davvero bella, perfettamente in tema con la stagione. Acquerellare questa rosa è un vero piacere e potete scegliere la tonalità di colore che preferite, adattandola al cartoncino di base che avete a disposizione. Per la mattatura ho scelto un ritaglio di carta che avevo nelle mie scorte, così come il banner che completa la tag.
The new release is really beautiful and you can choose the color you like to fill this delicate rose.
For the background, I used a piece of patterned paper I had in my stash; the same for the banner that completes the tag.

Trovate tutti i prodotti disponibili o ordinabili sul sito di The Happy Place Shop.
You can find or order all the products on The Happy Place Shop.

Timbro / Stamp: Rose (La Coppia Creativa)
Fustella / Die: Ticket (La Coppia Creativa)
Colorazione / Coloring: Karin Brushmarker PRO, Prismacolors
Carta / Paper: Canson Montval

venerdì 29 aprile 2022

A spasso in bicicletta / Cycling around

Finalmente è arrivata la bella stagione e con lei la voglia di uscire e godersi la natura! Di sicuro questi dolcissimi personaggi di MFT sanno come fare.

After a week of rain and chill I can embrace Spring back finally! We are happy to go out and join the nature, like these sweet characters by MFT.

Per i maialini ho un debole, questo già lo sapete...

I have a soft spot for pigs, you know...

Per realizzare queste card come ho fatto io per il post di aprile di The Happy Place, vi basta il solo set di timbri ed uno stencil con un disegno a raggi. E naturalmente i colori che preferite!
You just need the stamp set and a radiating rays stencil to make this pair of cards, like I did for The Happy Place April post.
And your favorire colors, of course.

Timbri / Stamps: Happy Mail MFT (disponibile su richiesta sullo shop The Happy Place)
Stencil: Radiating Rays MFT
Colorazione / Coloring: Mini Distress Ink

mercoledì 30 marzo 2022

Voglia di mare / Desire of the sea

Avete presente quando iniziate un progetto e dopo 2 minuti lo buttereste direttamente nel water? Poi andate avanti un pochino e cominciate a cambiare leggermente prospettiva... Poi arrivate alla fine e vi piace un sacco! Ecco, questa è la storia della card a tema marino che vedete qui.

How often do you feel the need to trash away a project you just started 2 minutes before? Instead, you go on anyway, and you realise you start liking it more and more... ending up loving it! That's what happened with this card!

Il timbro mi è piaciuto subito appena l'ho visto sul sito di The Happy Place. L'ho stampato in azzurro con l'idea di fare una colorazione no line, ma ho iniziato a perdermi tra le pieghe della coda della sirena, i suoi capelli, i tratti del viso... poi sono passata a colorare la testa del cavalluccio e non ho più smesso.

I liked the stamp the moment I saw it on The Happy Place shop. I printed it with light blue ink and started a no line coloring, but then I got lost between the siren's tail folds, the hair, the face lines... only when I started coloring the seahorse head I couldn't stop.

Ho ripreso i particolari con le matite colorate Prismacolors, un pennarellino nero a punta fine e la penna gel bianca. Ho aggiunto alcune timbrate in seconda battuta sullo sfondo e qualche splatter di colore blu per richiamare il mare.

I retraced details with Prismacolors pencils, a black fine liner and a white gel pen. Then I added some light prints and blue splatters on the background.

Come tocco finale ho passato la coda e le pinne della sirena con il pennarello Specrum Noir glitterato trasparente e ho colorato con un pennarello ad alcool nero delle mezze perle da incollare tra i capelli della sirena e sulle briglie del cavalluccio. Un paio di finti francobolli e una fila di stelline metalliche conferiscono il tocco 3D al tutto.

As a final touch, I colored the siren's tail and fins with sparkle transparent Specrum Noir and some half pearls with a black alcool pen and put them on the head of siren and seahorse both. A couple of fake stamps and some metallic stars in my stash add the 3D effect.

  • Timbri / Stamps: Mythical Creatures 09 - An elegant pair (The Card Hut), Nautical (Stampers Anonimous), Papillon CMS106 (Stampers Anonymous), "Dans la Lune" Univers (Chou & Flowers)
  • Fustelle / Dies: Troquel Sellos Postales (Lora Bailora), Thinlits 660210 (Sizzix Tim Holtz Alterations)
  • Colorazione / Coloring: Zig Clean Colors Real Brush, Mini Distress Ink Pad, Prismacolors, sparkle transparent Specrum Noir
  • Carta / Paper: Canson Montval

lunedì 21 febbraio 2022

Un'apetta tra le pagine / A little bee between the pages

Sulla scia del progetto della cornicetta esagonale (la potete vedere qui), oggi vi propongo un secondo progetto con le apine realizzato per il negozio The Happy Place.
In the wake of the previous project (this hexagonal frame), today I like to share another project with the sweet bees set I made for The Happy Place shop.

La composizione è molto simile alla precedente, ma questa volta si tratta di un segnalibro angolare, che è già diventato il mio preferito!
Trovate lo schema per realizzare la base qui.
The composition is very similar to the previous one, but this time I chose to make an angular bookmark (my favorite one yet!).
You can find the origami base tutorial in this post.

Anche il retro è decorato con una delle scritte e delle piccole fustellate.
I decorated the back side too with sentiments and few dies.

Ritrovarmelo nel libro ogni sera mi fa sorridere e mi addormento serena, come questa apetta :)
Find this sleeping bee every night in my book makes me smile and I fall asleep serene, like this little one :)


Materiali / Supplies

- Set timbri Sweet Bee
- Set fustelle Sweet Bee
- Set fustelle Esagoni Cuciti (Impronte d'Autore)
- Set Nuvolette (Impronte d'Autore)
- Set Cuoricini (Impronte d'Autore)
- Set 88232 Alfabeto (Impronte d'Autore)
- Carta kraft da 150 gr.
- Cartoncino giallo, rosso e marrone
- Carta Bumblebee dot/Honeycomb (Doodlebug Design)
- Tampone Versafine Onyx Black
- Pennarelli acquerellabili Zig Clean Colors
- Paillette iridescenti

venerdì 11 febbraio 2022

Cornicetta esagonale / Little hexagon frame

Oggi inauguro la collaborazione con il negozio The Happy Place con questa cornicetta scrap esagonale, in cui le apette di Impronte d'Autore e la magnifica città di Roma (direi più che appropriata ^_^) sono protagoniste.
This little hexagonal frame, where the Sweet Bee set by Impronte d'Autore and the wonderful city of Rome are the main characters, celebrates my new cooperation with The Happy Place shop.

Il credito del modello è tutto di Emanuela Enei e grazie al suo video tutorial dettagliatissimo sono riuscita a realizzare questa struttura esagonale in pochissimo tempo e con estrema precisione (gli errori visibili sono solo miei) partendo da un foglio di carta kraft da 150 gr.
I must credit the structure to Emanuela Enei: thanks to her video tutorial I was able to make this hexagonal structure in short time and with precision from a 150 gr kraft paper sheet.
 
La cornice è alta 10,5 cm, larga 12 cm e spessa 1 cm e per realizzarla ho usato sia gli esagoni impunturati di Impronte che gli esagoni della Coppia Creativa.
The frame mesures are: 10,5 cm (hight) x 12 cm (width) x 1 cm (thickness). To make it I used both Hexagons by Impronte and by La Coppia Creativa.

Il resto è stato puro divertimento nel decorare la struttura. Anche gli elementi interni e le nuvolette sono fustelle di Impronte d'Autore.
I had so much fun adding decorations and embellishments to the structure! Inner elements and clouds are by Impronte d'Autore too.


Da ultimo ho praticato un foro sul bordo superiore per inserire un cordino e così la cornicetta è diventata un piccolo home decor!
At last, I made a hole in the upper edge side to insert a thread and make the frame a little home decor!


Materiali / Supplies

- Set timbri Sweet Bee
- Set fustelle Sweet Bee
- Set fustelle Esagoni Cuciti (Impronte d'Autore)
- Set fustelle Esagoni (La Coppia Creativa)
- Set Nuvolette (Impronte d'Autore)
- Set Cuoricini (Impronte d'Autore)
- Carta kraft da 150 gr.
- Cartoncino giallo, rosso e marrore
- Carta Bumblebee dot/Honeycomb (Doodlebug Design)
- Tampone Versafine Onyx Black
- Pennarelli acquerellabili Zig Clean Colors
- Paillette iridescenti
- Spago naturale

giovedì 20 gennaio 2022

Una nuova avventura / A new adventure

Finalmente posso svelarvi questa novità! Da gennaio sono entrata a far parte del DT di The Happy Place insieme a tantissime altre creative!
Non vedo l'ora di mettermi al lavoro con i prodotti di questo negozio felice ^_^
Finally I can tell you the news: I'm in the DT of the shop The Happy Place with a selection of talented crafters! I can't wait to start creating with the products of this happy shop! ^_^

Impronte d'Autore è uno dei brand che potete trovare nello shop.
Impronte d'Autore is one of the brands you can find beyond others.


Fustelle / Dies: Fairy Forest
Colorazione / Coloring: Distress Ink; Zig Clean Colors Real Brush


LinkWithin

Related Posts Plugin for WordPress, Blogger...