
Ed eccoci al terzo post di gennaio per il Simon Says Stamp Monday Challenge!

Here we are with the third January post on Simon Says Stamp Monday Challenge blog!

Il tema di questa settimana è "Animali a 4 zampe".
The theme of this week challenge is "4 Legged Animals".

Con questo progetto ho rispolverato la tecnica del paper piecing, che consiste nel ritagliare e sovrapporre le diverse parti del personaggio in modo da creare un effetto tridimensionale. È una tecnica che richiede un po' di tempo e pazienza, ma l'effetto è davvero d'impatto. Mi sembrava il modo migliore di dare risalto al protagonista della tag di oggi, anche come omaggio alla mascotte del brand che gentilmente mi ospita sul blog del Simon Monday Challenge. 😊
Come per i post precedenti, qui di seguito trovate alcuni passaggi della realizzazione, mentre in fondo al post ho elencato i materiali che ho utilizzato con i link al negozio di Simon.
This project made me refresh the 3D paper piecing technique: it requires patience and time, but the final result is really appealing. Moreover, I believed it could emphazize the main subject of the tag best, and it could be the right tribute to the mascotte of the brand that kindly guest me on Simon Monday Challenge blog. 😊
As for the previous posts, please find below some steps of the making of as well as the list of products I made use of during the process, and the useful links to Simon's store.
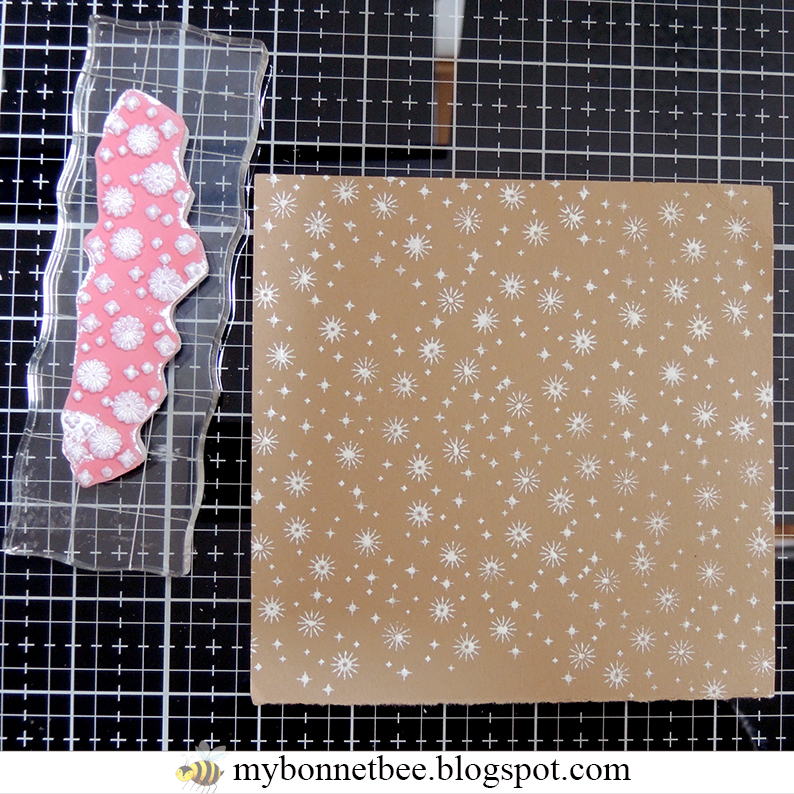
Il primo step è quello di preparare lo sfondo della tag stampando il timbro con i fiocchi di neve del set "Christmas Magic" sul cartoncino craft utilizzando il tampone Distress Ink Picket Fence.
The first step is to set up the background by stamping the snowflakes of the stamp set "Christmas Magic" onto the craft paper by using the Distress Ink Picket Fence pad.

Tagliate dal cartoncino bianco il profilo di una collina innevata a mano libera o utilizzando una fustella. Incollatela allo sfondo con i fiocchi di neve e fustellate il tutto con la fustella tag più grande del set "Framed Tags". Quindi incollate la tag su un cartoncino bianco e rifilate un bordino da 2 mm.
Cut a hill profile from the white paper by hand or using a die. Glue it on the background and cut it with the biggest tag die of the set "Framed Tags". Then glue the tag onto a white paper piece and trim out the edges leaving a small white border.

Utilizzando la fustella "Festive Words" tagliate le parole "winter" (eliminando con le forbicine la parola "hello") e "joy" da un cartoncino azzurro e sfumatene i bordi con il Distress Ink Vintage Photo. Quindi tagliate la base bianca e componete il sentiment pronto per essere incollato sullo sfondo usando il biadesivo spessorato.
Cut the words "winter" and "joy" from a light blue paper by using the "Festive Words" die (I cut out the word "hello"), and blend the edges with Distress Ink Vintage Photo. Then cut the outline from the white paper and layer the sentiment ready to be attached onto the base panel.

Stamp the dog you like from the set "Crazy Dogs" 5 times by using a proper ink pad for the medium you choose to color the elements. I used Versafine Onyx Black onto a watercolor paper and Zig Clean Color Real Brush watercolor markers. Cut all the elements like in the picture (easy peasy with the Mini Snip Scissors!): to put more interest on the character, you can draw a jumper on your buddy coordinate to the color of the sentiment "Winter Joy".

Arrotondate ogni elemento sul lato posteriore usando lo Shaping Kit o un bulino a testa larga su una base morbida. Una volta pronti tutti gli elementi, potete attaccare i diversi strati usando il biadesivo spessorato nella parte più bombata, seguendo la numerazione indicata nella foto precedente (non preoccupatevi per la zona del collo: se usate il biadesivo solo nel centro, avrete tutto lo spazio per inserire la sciarpa).
Round every cut element on the back side by using the Shaping Kit or a big stylus on a molding pad. At this point, you can layer them following the numbers in the previous picture by using little pieces of foam adhesive in the center of each element (don't worry about the neck: if you put the adhesive just in the center, there will be enough space to insert the scarf).

Per arricchire l'outfit del personaggio, fustellate cappellino e sciarpa dal set "Winter Critters" nel colore che preferite (nel mio caso due tonalità di verde).
To enrich the outfit of your dog, cut a beanie and a scarf by using the "Winter Critters" die set from colored paper (I chose two tones of green).

Sfumate i bordi con il Distress Ink Walnut Stain, quindi vestite il vostro personaggio.
Blend the edges with Distress Ink Walnut Stain, then dress your character.

Da ultimo componete la tag attaccando i diversi elementi e aggiungendo alcune paillette iridescenti per conferire qualche colpo di luce.
Spero il progetto vi sia piaciuto, io mi sono divertita un sacco a realizzarlo!
At last layer the elements to compose the tag and add 4-5 iridescent sequins to give it some light.
I hope you like my project, I had so much fun making it!
Partecipate alla challenge per vincere un buono da $25 da spendere nel negozio di Simon Says Stamp!
Join the challenge and win a $25 gift voucher to Simon Says Stamp store!


Potete trovare tutti i prodotti che ho utilizzato nello store di Simon Says Stamp. Vi metto qui sotto la lista completa dei materiali.
You can find all the products I used in the Simon Says Stamp store. They are listed below.

Prodotti usati / Products used
Tim Holtz Distress Ink Picket Fence, Vintage Photo, Walnut Stain
Zig Clean Color Real Brush Marker: Black, Red, Wine Red, Light Blue, Cornflower Blue, Mid Brown, Mustard, Blush, Flesh, Gray Tint

What a cute tag Monica!! the little pup is adorable and I love his winter woolies! the background and whole design of this is just gorgeous!! I need to get me the Winter Critters Die Set!
RispondiEliminaThanks so much!
Hope you have a great week!
luv
Lols XXX
Thank you Lorraine! ^_^ The Winter Critter Set is a must! I love these guys!!
Elimina