lunedì 16 gennaio 2023

Simon Says Stamp - Designer Spotlight Week 3 - "4 Legged Animals"

Ed eccoci al terzo post di gennaio per il Simon Says Stamp Monday Challenge!


Here we are with the third January post on Simon Says Stamp Monday Challenge blog!

Il tema di questa settimana è "Animali a 4 zampe".
The theme of this week challenge is "4 Legged Animals".

Con questo progetto ho rispolverato la tecnica del paper piecing, che consiste nel ritagliare e sovrapporre le diverse parti del personaggio in modo da creare un effetto tridimensionale. È una tecnica che richiede un po' di tempo e pazienza, ma l'effetto è davvero d'impatto. Mi sembrava il modo migliore di dare risalto al protagonista della tag di oggi, anche come omaggio alla mascotte del brand che gentilmente mi ospita sul blog del Simon Monday Challenge. 😊
Come per i post precedenti, qui di seguito trovate alcuni passaggi della realizzazione, mentre in fondo al post ho elencato i materiali che ho utilizzato con i link al negozio di Simon.
This project made me refresh the 3D paper piecing technique: it requires patience and time, but the final result is really appealing. Moreover, I believed it could emphazize the main subject of the tag best, and it could be the right tribute to the mascotte of the brand that kindly guest me on Simon Monday Challenge blog. 😊
As for the previous posts, please find below some steps of the making of as well as the list of products I made use of during the process, and the useful links to Simon's store.
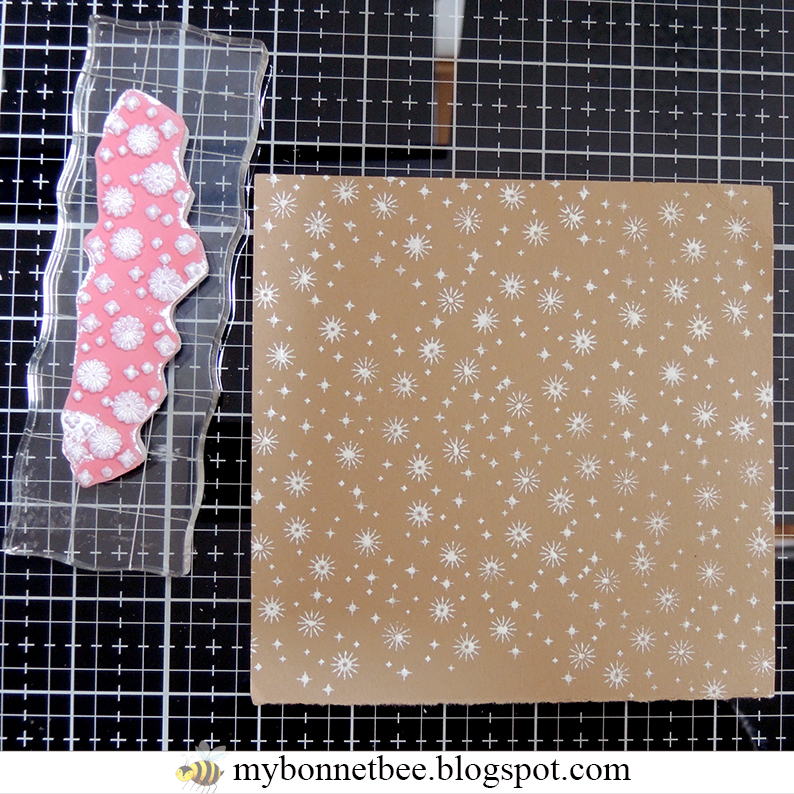
Il primo step è quello di preparare lo sfondo della tag stampando il timbro con i fiocchi di neve del set "Christmas Magic" sul cartoncino craft utilizzando il tampone Distress Ink Picket Fence.
The first step is to set up the background by stamping the snowflakes of the stamp set "Christmas Magic" onto the craft paper by using the Distress Ink Picket Fence pad.

Tagliate dal cartoncino bianco il profilo di una collina innevata a mano libera o utilizzando una fustella. Incollatela allo sfondo con i fiocchi di neve e fustellate il tutto con la fustella tag più grande del set "Framed Tags". Quindi incollate la tag su un cartoncino bianco e rifilate un bordino da 2 mm.
Cut a hill profile from the white paper by hand or using a die. Glue it on the background and cut it with the biggest tag die of the set "Framed Tags". Then glue the tag onto a white paper piece and trim out the edges leaving a small white border.

Utilizzando la fustella "Festive Words" tagliate le parole "winter" (eliminando con le forbicine la parola "hello") e "joy" da un cartoncino azzurro e sfumatene i bordi con il Distress Ink Vintage Photo. Quindi tagliate la base bianca e componete il sentiment pronto per essere incollato sullo sfondo usando il biadesivo spessorato.
Cut the words "winter" and "joy" from a light blue paper by using the "Festive Words" die (I cut out the word "hello"), and blend the edges with Distress Ink Vintage Photo. Then cut the outline from the white paper and layer the sentiment ready to be attached onto the base panel.

Per la tecnica del paper piecing, stampate 5 volte su cartoncino bianco il cane che preferite dal set "Crazy Dogs" utilizzando il tampone adeguato al medium che userete per colorarlo. Nel mio caso ho stampato su cartoncino acquerellabile con il Versafine Onyx Black e ho colorato con i pennarelli acquerellabili Zig Clean Color Real Brush. Tagliate le singole parti che andranno sovrapposte: per creare maggiore interesse, potete disegnare un maglioncino da far indossare al vostro amico a quattro zampe, magari coordinando la colorazione con la scritta Winter Joy.
Stamp the dog you like from the set "Crazy Dogs" 5 times by using a proper ink pad for the medium you choose to color the elements. I used Versafine Onyx Black onto a watercolor paper and Zig Clean Color Real Brush watercolor markers. Cut all the elements like in the picture (easy peasy with the Mini Snip Scissors!): to put more interest on the character, you can draw a jumper on your buddy coordinate to the color of the sentiment "Winter Joy".

Arrotondate ogni elemento sul lato posteriore usando lo Shaping Kit o un bulino a testa larga su una base morbida. Una volta pronti tutti gli elementi, potete attaccare i diversi strati usando il biadesivo spessorato nella parte più bombata, seguendo la numerazione indicata nella foto precedente (non preoccupatevi per la zona del collo: se usate il biadesivo solo nel centro, avrete tutto lo spazio per inserire la sciarpa).
Round every cut element on the back side by using the Shaping Kit or a big stylus on a molding pad. At this point, you can layer them following the numbers in the previous picture by using little pieces of foam adhesive in the center of each element (don't worry about the neck: if you put the adhesive just in the center, there will be enough space to insert the scarf).

Per arricchire l'outfit del personaggio, fustellate cappellino e sciarpa dal set "Winter Critters" nel colore che preferite (nel mio caso due tonalità di verde).
To enrich the outfit of your dog, cut a beanie and a scarf by using the "Winter Critters" die set from colored paper (I chose two tones of green).

Sfumate i bordi con il Distress Ink Walnut Stain, quindi vestite il vostro personaggio.
Blend the edges with Distress Ink Walnut Stain, then dress your character.

Da ultimo componete la tag attaccando i diversi elementi e aggiungendo alcune paillette iridescenti per conferire qualche colpo di luce.
Spero il progetto vi sia piaciuto, io mi sono divertita un sacco a realizzarlo!
At last layer the elements to compose the tag and add 4-5 iridescent sequins to give it some light.
I hope you like my project, I had so much fun making it!

sabato 14 gennaio 2023

Buoni propositi / Good resolutions

Uno dei miei propositi per il nuovo anno è quello di decorare l'intestazione di ogni mese dell'agenda, attività che avevo iniziato nel 2022, poi naufragata miseramente. Così per gennaio ho chiesto aiuto a Chilly e Freezy, i due pupazzi di neve del set di fustelle disegnato da Tim Holtz come prodotto omaggio di dicembre per Simon Says Stamp. Fortunatamente sono riuscita ad accaparrarmeli prima che andassero a ruba e mi faranno compagnia per questo primo mese dell'anno portando un po' di allegria nei giorni freddi e grigi.

Decorating the heading of my journal is one of the good resolutions for the New Year: I started well in 2022, but just for the first months... So I asked for some help and hired Chilly and Freezy, the sweet little snowmen from the die set designed by Tim Holtz for Simon Says Stamp as a December gift. I'm one of the lucky customer to get one before it went out of stock and now they will cheer the cold gray days of January.

Voi avete già stilato la lista dei buoni propositi per il 2023?

Did you write down your good resolutions list for 2023 already?

Fustelle / Dies: Tim Holtz Sizzix Chilly and Freezy, Tim Holtz Sizzix Alphanumeric Theory

giovedì 12 gennaio 2023

Allegri pinguini / Cheerful penguins

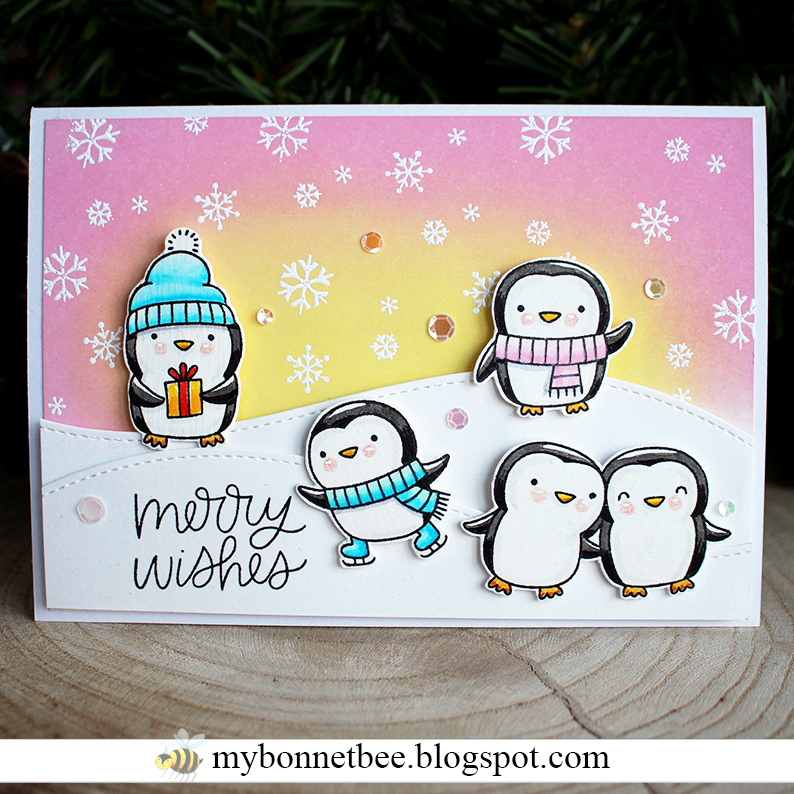
Ora che finalmente questa card è arrivata a destinazione, posso mostrarla pubblicamente!
This card arrived to destination and I can finally show it to the world!
 
Questi pinguini sono davvero dolcissimi e mi sono divertita un sacco a colorarli e farli giocare sulla neve.
I love these cute chubby penguins and I enjoyed coloring them and putting them on the snow.

Prossimo acquisto: le fustelle coordinate! 😄
I absolutely need the coordinate dies! 😄

Timbri / Stamps: Penguins Pals Stamp Set (Pretty Pink Posh), Snowman & Friends (Impronte d'Autore)
Fustelle / Dies: Stitched Hillside Borders (Lawn Fawn)
Colorazione / Coloring: Zig Clean Colors, Distress Oxide

lunedì 9 gennaio 2023

Simon Says Stamp - Designer Spotlight Week 2 - "Shake it up"

Eccomi qui nella mia seconda settimana sul blog Simon Says Stamp Monday Challenge per condividere un progetto che vi ispiri per una nuova sfida!

Here I am on Simon Says Stamp Monday Challenge blog into the Designer Spotlight for the second week of January!


Il tema di questa settimana è "Shake it up".
The challenge theme of this week is "Shake it up".

Ho preparato per voi una card romantica dal gusto vintage con tre elementi shaker, usando per lo più prodotti di Tim Holtz. Ho scattato diverse foto durante la lavorazione così che possiate replicarla, se lo desiderate (come sempre, trovate la lista dei materiali in calce al post).
I made a vintage romantic card with three shaker elements using mostly products by Tim Holtz.
I kept some pictures during the making of to show you the process (you can find the products list at the end of this post).

Tagliate un pezzo di cartoncino Mixed Media di 20x15 cm circa e stampate nel centro il timbro floreale dal set "Exquisite" utilizzando il tampone Versafine Vintage Sepia. Riempite gli spazi vuoti con il timbro calligrafico del set utilizzando il tampone Distress Oxide Kitsch Flamingo.
Cut a piece of Mixed Media cardstock about 8" x 5.5" and print in the middle the floral stamp from "Exquisite" set by using the Versafine Vintage Sepia ink pad. Fill the white spaces printing the calligraphy stamp from the same set by using the Distress Oxide Kitsch Flamingo ink pad.

Rifilate il pannello a 17x12,5 cm e sfumate i bordi con il Distress Ink Victorian Velvet spingendovi un po' verso il centro e con il Ground Espresso giusto sui bordi. Quindi lasciate cadere delle goccioline create utilizzando un po' di Ground Espresso e Rusty Hinge diluiti e delle gocce di Tarnished Brass Mica Spray.
Cut out the edges in excess to obtain a 6.5" x 5" panel. Blend the edges with Distress Ink Victorian Velvet and with Ground Espresso just on the very edge. Then splatter some drops of diluted Ground Espresso and Rusty Hinge, and some drops of Tarnished Brass Mica Spray.

Tagliate tre pezzi di cartoncino Mixed Media usando la parte forata della fustella diapositiva dal set "Specimen". Coloratene uno sfumandolo con il Distress Oxide Speckled Egg, un altro con il Distress Oxide Shabby Shutters e l'ultimo con il Distress Ink Victorian Velvet. Aggiungete qualche goccia d'acqua e fate asciugare, quindi sfumate tutti i bordi con il Ground Espresso. Tagliate altri pezzi uguali da qualsiasi cartoncino: saranno gli strati che comporranno gli elementi shaker.
Cut three piece of Mixed Media cardstock using the holed side of the slide die from "Specimen" set. Blend one piece with Distress Oxide Speckled Egg, one with Distress Oxide Shabby Shutters and the last one with Distress Ink Victorian Velvet. Add few drops of water and let them dry, then blend all the edges with Ground Espresso. Cut out other slide pieces from any cardstock you have: they will be the layers of our shaker elements.

Per ciascuno dei pezzi sfumati, incollate un pezzetto di acetato trasparente sul lato posteriore a coprire la finestra, quindi incollate sopra 4 o 5 pezzi di cartoncino sagomati a diapositiva: la colla Nuvo è perfetta per entrambi i materiali.
Glue a piece of transparent acetate under each colored piece to cover the window, then glue 4 or 5 slide pieces under the acetate: the Nuvo glue is perfect for both materials.

Colorate un pezzetto di cartoncino Mixed Media con il Ground Espresso e ricavate due tag: ad una abbinerete la fustella "archive", alla seconda la fustella "collect": conservate le lettere per comporre la parola "memories" aggiungendo anche le lettere della fustella "specimen" (lo so, maneggiare queste lettere piccolissime non è semplice!😁). Incollate tutti gli elementi sulla parte frontale delle diapositive e ricavate tre cornicette per le etichette. Ricopritele con la Gilded Foundry Wax ed embossatele prima di incollarle sulle etichette.
Color one piece of Mixed Media cardstock with Ground Espresso and cut out one tag matched to the "archive" die and another tag matched with "collect" die. Keep the cut out letters and use the "specimen" die to cut the remaining letters to compose the word "memories" (I hope these very little letters don't drive you crazy! 😁). Glue all the elements on the front of the slides and cut three little frame for each piece. Cover them with Gilded Foundry Wax and emboss them before gluing them on the tags.

Tagliate l'elemento tab e ricoprite anche lui con la Gilded Foundry Wax. Intagliate i numeri che preferite e incollate il tab sopra una targhetta colorata con il Ground Espresso. Incollate il pezzo così composto sul margine superiore a sinistra del pannello frontale.
Cut the tab element and cover it with the same Gilded Foundry Wax. Cut out the numbers you like and glue the tab onto a tag element colored with Ground Espresso. Glue the compose piece on the upper left side of the front panel.

Riempite ogni finestra di paillette vellum e incollate le slide sul pannello. Aggiungete un fermacampioni ad ogni angolo per coprire il foro e fissare meglio gli elementi shaker. 
L'ultimo passaggio è quello di attaccare il pannello sulla base della card utilizzando le strisce di biadesivo spessorato. Sfumate leggermente anche i margini della base usando il Ground Espresso per uniformarlo al pannello.
Fill the shaker elements with vellum sequins and glue them on the panel. Add a brad on each corner to fill the little hole: it helps to keep the shaker element in position. 
As the last step, attach the front panel onto a base card by using the adhesive foam strips, and shake it!


Spero il mio progetto vi sia piaciuto. Partecipate alla challenge per vincere un buono da $25 da spendere nel negozio di Simon Says Stamp!
Hope you liked my project. Join the challenge and win a $25 gift voucher to Simon Says Stamp store!

Potete trovare tutti i prodotti che ho utilizzato nello store di Simon Says Stamp. Vi metto qui sotto la lista completa dei materiali.
You can find all the products I used in the Simon Says Stamp store. They are listed below.


Prodotti usati / Products used


lunedì 2 gennaio 2023

Simon Says Stamp - Designer Spotlight Week 1 - "Light up the New Year"

Il mio 2023 inizia col botto! Sono stra-felice ed onorata di essere su Simon Says Stamp Monday Challenge per tutto il mese di gennaio! Ma siamo seri?!? SIMON!! Ci credereste? Mi sto ancora dando pizzicotti per vedere se sia vero! 😄

My 2023 starts with a bang! I'm sooooooo excited and honored to be on Simon Says Stamp Monday Challenge into the Designer Spotlight for January! C'mon: SIMON!!! Can you believe it?!? I'm still going pinching myself to make sure this is real 😄

Il tema di questa prima settimana di gennaio è "Light up the New Year".
The theme of the challenge of the first week of January is "Light up the New Year". 

Per il mio primo progetto per il Simon Says Stamp Monday Challenge ho scelto di realizzare una card che può diventare un home decor.  Qui la vedete con le luci accese.
For my first post on the Simon Says Stamp Monday ChallengeI chose to make a standing card that can be a home decor. Here is the card with the lights on.

Qui invece nella versione a luci spente. Nella descrizione qui di seguito vi racconto come replicarla (trovate in fondo al post la lista dei prodotti utilizzati).
Here the lights off version. I show you below how to make it (you can find the products list at the end of this post).

Per prima cosa occorre stampare il set di timbri "If kisses were stars" con il tampone Versamark su cartoncino bianco, quindi embossare con la polvere oro.
First print the "If kisses were stars" stamp with Versamark ink on white card stock, then add the gold embossing powder and heat.

Sfumate i Distress Oxide in foto su tutto il cartoncino per creare lo sfondo del cielo.
Blend these Distress Oxide Inks on the background.

Fate cadere qualche goccia d'acqua per creare un po' di movimento, quindi posizionate la fustella "Blok build up cardshape die" sul cartoncino e fissatela con del washi tape così che resti in posizione durante il taglio.
Add some water splatters to the background, then place the "Blok build up cardshape die" onto the colored card stock with the help of some washi tape strips, and cut the elements.

Utilizzate lo stesso set di fustelle per tagliare la base della card nel cartoncino bianco ed incollatevi gli elementi corrispondenti dello sfondo. Quindi colorate il centro delle stelle con la penna gel bianca e aggiungete qui e là qualche stella.
With the same die cut out the base from another white card stock and glue on it the colored elements. Fill the centre of the stars with a white gel pen and add some stars here and there.

Praticate dei fori da 3 mm al centro delle stelle sul lato destro e nel cielo dove preferite (il numero dei fori in genere corrisponde a quello dei led del sistema di illuminazione).
Make a 1/8" hole in the centre of each stars on the right side and some others wherever you like (usually the same number of the leds). 

Girate la card sul retro e coprite i fori con dei quadratini di vellum incollandoli lungo il margine.
Turn the card base on the back side and place a piece of vellum on each hole.

Collocate ciascun led in corrispondenza dei buchi (potete tagliare quelli eccedenti), e fermateli con delle strisce di biadesivo (io ho incollato delle strisce di carta leggera per essere certa che l'adesivo tenesse nel tempo). A questo punto attaccate delle strisce di biadesivo spessorato lungo il perimetro.
Place one led on each hole (you can reduce the lenght of the led wire) and keep it in place with adhesive strips (I use light paper and glue to be sure that works well). Then add some strips of adhesive foam on the perimeter.

Tagliate un secondo pezzo di base nel cartoncino bianco, in modo da ricavare il pezzo che servirà a coprire i led. Ricordatevi di lasciare fuori il contenitore della batteria e di collocarlo attaccato al retro mediante una striscia di cartoncino lunga 8x5 cm e avvolta sul porta batteria.
With the base die cut a piece of card stock to cover the leds on the back of the card. Remember to leave out the battery holder and place it on the back inside a card stock case made by a strip 3"x2" long.

Per completare la card, tagliate due cerchi di 5 cm e sfumateli con lo stencil "Moon Mask" di Tim Holtz usando il Distress Ink Pumice Stone. Incollateli tra loro sul retro includendo anche un pezzetto di filo da pesca sottile che userete per agganciare la luna alla parte alta della card. Infine, stampate la scritta del set "How many nights moon flower" usando l'Archival Faded Jeans ed embossatelo con la polverina trasparente, quindi scontornatelo e incollatelo sulla parte in basso a sinistra della card usando il biadesivo spessorato. Due stelline del primo set di timbri embossate in oro, colorate in giallo con il pennarello Zig Lemon Yellow e scontornate, accompagnano la scritta sui lati, spessorate anche loro con il biadesivo.
Finita! Ora vi basta solo accenderla! ^_^

To complete the card, cut two 2" circles and blend each with the Tim Holtz "Moon Mask Stencil" by using the Distress Ink Pumice Stone and glue them together with a piece of thin fish wire inside, then bind the moon on the top of the card. At last, print the sentiment from the set "How many nights moon flower" with the Archival Faded Jeans and emboss it with the clear powder and place it on the down side by using adhesive foam. Add two stars embossed in gold and watercolored with Zig Clean Color Yellow marker. 
That's it: light on and enjoy! ^_^

Partecipate alla challenge per vincere un buono da $25 da spendere nel negozio di Simon Says Stamp!
Join the challenge and win a $25 gift voucher to Simon Says Stamp store!

Potete trovare tutti i prodotti che ho utilizzato nello store di Simon Says Stamp. Vi metto qui sotto la lista completa dei materiali.
You can find all the products I used in the Simon Says Stamp store. They are listed below.


Prodotti usati / Products used


LinkWithin

Related Posts Plugin for WordPress, Blogger...