mercoledì 21 ottobre 2015

Vicenza: Abilmente (autunno 2015) - il cucito

Anche questa edizione di Abilmente non si è smentita per il gran numero di visitatrici e di espositori.
Come sempre, girarla tutta è stato impossibile, ma ho carpito qualche scatto per l'immancabile reportage.
Partiamo con il cucito.
As always, this last edition of Abilmente fair has luton display a huge number of visitors and exhibitors. I couldn't visit it as I wished, but I took some pictures for my unmissable reportage.
Let's start from sewing.


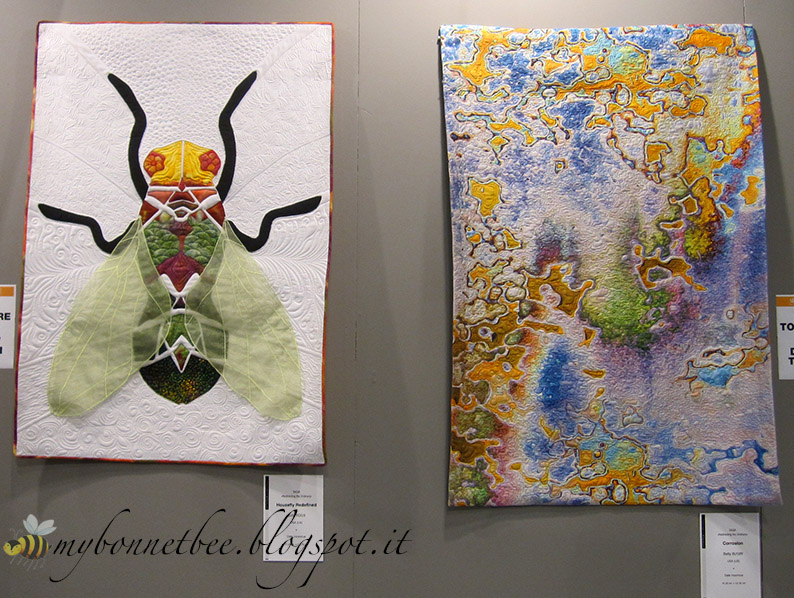
Il mio livello di cucito rasenta lo zero, ma questo non mi impedisce di ammirare i lavori di patchwork e quilting in concorso questo autunno. Ore e ore di lavoro per creare questi magnifici capolavori.
Although my sewing level is near to zero, the patchwork and quilting pieces in this edition contest took my breath away. Think at the amount of hours spent to create such masterpieces.


Questa mantella steam punk è strepitosa, non trovate? Certo, forse impegnativa da indossare, ma assolutamente un pezzo d'arte.
It this steam punk cape amazing or what? A little bit challenging to wear, of course, but really a piece of art.

sabato 17 ottobre 2015

Colorare una zucca coi Chameleon / Using Chameleon to colour a pumpkin: a tutorial

Per le tag di Halloween quest'anno ho deciso di fare un mix: base acquerellata e soggetto principale colorato con i pennarelli ad alcool Chameleon.
Dopo aver pasticciato con le prime zucche, ho trovato la combinazione di colore che mi è piaciuta di più, e ho deciso di condividerla con voi. Naturalmente, va bene sia che dobbiate colorare una normalissima paffuta zucca, o Jack O' Lantern, come nel mio caso.
In occasion of this year Halloween tags, I chose to blend watercolored, for the background, and Chameleon pens, for the main figure.
After a few unsuccessful attempts, I came up with the right combination of colours; I liked it so much that I chose to share it with you. You can use it with a normal chubby pumpkin or Jack O' Lantern, of course.

Il primo colore che ho usato è il Warm Sunset, sfumando gli "spicchi" esterni della zucca dall'esterno verso l'interno.
Per lo spicchio centrale, invece, ho preferito sfumare dal centro verso l'alto per la metà superiore e dal centro verso il basso per la metà inferiore. Da ultimo ho colorato in modo uniforme il tralcio.
The first colour I turned to was Warm Sunset: I shadowed the pumpkin external slices from the outside to the inside. For the central slice I preferred to shadow it from the center to the poles. Then I full coloured the stem.

Per il secondo passaggio ho usato il Seville Orange, procedendo allo stesso modo per il corpo della zucca e solo sulla parte inferiore per il tralcio. Per smorzare il tono dell'arancio, molto flesciato (mi si passi il neologismo), ma comunque necessario per dare brillantezza, ho passato ai poli della zucca e sulla parte inferiore del tralcio l'Hot Cocoa, con cui ho colorato anche il contorno di occhi e bocca di Jack 'O Lantern.
I used Seville Orange for the second step: I proceeded in the same way for the pumpkin body and the lower part of the stem. To smooth the "flashing" (but enlightening) orange, I blend it with Hot Cocoa on the poles, which I used also for eyes and mouth outline.

Ultimo passaggio con l'Olive Green sul tralcio, distribuendolo in modo uniforme. Ed infine il nero della Detail Pen per occhi e bocca, e la penna gel bianca (Hybrid Pentel) per il riflesso sulla parte superiore della zucca.
Last step with Olive Green on the stalk, coloring uniformly. Then the black Detail Pen for inner eyes and mouth, and white pen gel (Hybrid Pentel) for the light reflections on the top.


Per la base della tag ho utilizzato i tamponi Distress Spiced Marmelade e Seedless Preserves con la tecnica "wrinkle free".
Tag base: I used Distress Spiced Marmelade and Seedless Preserves pad, using the wrinkle free technique.

Nonostante sia un lavoro seriale, la cosa che mi piace di più è che ogni tag è unica, ciascuna con la sua sfumatura di colore.
Despite the serial nature of this work, colour shading makes each tag a unique and I loved it.


Timbri / Stamps: Happy Halloween

lunedì 12 ottobre 2015

Auguri in rosso / Greetings in red

Vi è piaciuto questo biglietto che ho realizzato un mesetto fa, ma non avete dei pennarelli ad alcool per colorarlo? Poco male, potete utilizzare anche gli acquerelli o le matite acquerellabili, o i tamponi e le ricariche Distress, come nel mio caso.
You liked this card I made last month, but you haven't got alcohol pens? Not too bad, you can get a good result with watercolors or Distress pad and reinkers, like I did.

Il procedimento è lo stesso, cioè la tecnica descritta molto bene nel video di Marika.
Questa volta, però, ho scelto un colore più deciso.
Same procedure: you can follow the beautiful video tutorial Marika made.
This time, though, I chose a strong color.

Qualche abbellimento qui e là, una mattatura di contrasto, e il gioco è fatto!
A few embellishments, a matting card stock and the card is done!

Timbri / Stamps: plate "Gli amici sono fiori", Stripes Pattern (Hero Arts), Flourish Birthday


mercoledì 7 ottobre 2015

Milano: Hobby Show (autunno 2015)

Milano apre la mia stagione fieristica autunnale. Nonostante sia una fiera molto piccola, riserva qualche chicca che difficilmente riuscirete a vedere in un'altra fiera creativa più blasonata.
Ecco qualche scatto fatto apposta per chi non ha avuto la possibilità di visitarla.
Milano Hobby Show opens my fair autumn season. Despite its small dimension, this fair offers a few pearls you can not find in bigger ones.
Here there are some shots dedicated to whom could not visit it.


Da ultimo, le immagini della preparazione della spettacolarissima torta da guinness dei primati creata da un esercito di pasticcieri durante i 4 giorni della manifestazione.
At last, shots of the preparation of the spectacular guinness cake created by an army of cake designers during the 4 days of the fair.


Qui potete vedere le immagini del risultato finale.
You can se here the final result.

giovedì 1 ottobre 2015

Card con stampa di fiori e sfondo / Card with stamped flowers and background

Dopo aver realizzato questa card con un timbro prestato da un'amica, mi è venuto lo sghiribizzo di provare a farne uno simile usando i timbri che avevo a casa, e questo è il risultato.
Volete provarci anche voi?
After making this card using a borrowed stamp, I chose to make a similar one only using my stamps, and here's the result. Would you like to do it yourself?

Per prima cosa ho stampato i timbri floreali con Versamark e polvere bianca su cartoncino da acquerello.
First, I stamped the flowers using Versamark ink and white embossing powder on a watercolor card stock.

Quindi li ho coperti mascherandoli con gli stessi fiori stampati su post-it e ritagliati.
Then, I masked them using post-it.

Il passo successivo è stato quello di stampare lo sfondo, sempre con Versamark e polvere da embossing bianca. Quindi ho tolto la mascheratura, e a questo punto il cartoncino era pronto per essere colorato.
The next step was to stamp the background using Versamark and white embossing powder again. Then, I took off the masking flowers, and the card stock was ready to colour.

Sia per i fiori che per lo sfondo ho scelto di usare le ricariche Distress, dai colori caldi e corposi.
I chose Distress reinkers to color both the flowers and the background.

Da ultimo, ho stampato il sentiment con lo Staz-on su carta vellum, prima di comporre la card.
At last, I stamped the sentiment using Staz-on on vellum paper, and composed the card.

Il procedimento è un pizzico laborioso la prima volta, ma se conservate le maschere dei fiori, vi assicuro che i tempi si accorciano notevolmente!
The first time, the making of takes a little to get at it, but if you keep safe the masking flowers, the next time will be shorter!

Timbri / Stamps: plate Gli amici sono fiori, plate Un fiore vale, Tiled Scallops Backgrounder (Cornish Heritage Farms).

LinkWithin

Related Posts Plugin for WordPress, Blogger...