lunedì 2 gennaio 2023

Simon Says Stamp - Designer Spotlight Week 1 - "Light up the New Year"

Il mio 2023 inizia col botto! Sono stra-felice ed onorata di essere su Simon Says Stamp Monday Challenge per tutto il mese di gennaio! Ma siamo seri?!? SIMON!! Ci credereste? Mi sto ancora dando pizzicotti per vedere se sia vero! 😄

My 2023 starts with a bang! I'm sooooooo excited and honored to be on Simon Says Stamp Monday Challenge into the Designer Spotlight for January! C'mon: SIMON!!! Can you believe it?!? I'm still going pinching myself to make sure this is real 😄

Il tema di questa prima settimana di gennaio è "Light up the New Year".
The theme of the challenge of the first week of January is "Light up the New Year". 

Per il mio primo progetto per il Simon Says Stamp Monday Challenge ho scelto di realizzare una card che può diventare un home decor.  Qui la vedete con le luci accese.
For my first post on the Simon Says Stamp Monday ChallengeI chose to make a standing card that can be a home decor. Here is the card with the lights on.

Qui invece nella versione a luci spente. Nella descrizione qui di seguito vi racconto come replicarla (trovate in fondo al post la lista dei prodotti utilizzati).
Here the lights off version. I show you below how to make it (you can find the products list at the end of this post).

Per prima cosa occorre stampare il set di timbri "If kisses were stars" con il tampone Versamark su cartoncino bianco, quindi embossare con la polvere oro.
First print the "If kisses were stars" stamp with Versamark ink on white card stock, then add the gold embossing powder and heat.

Sfumate i Distress Oxide in foto su tutto il cartoncino per creare lo sfondo del cielo.
Blend these Distress Oxide Inks on the background.

Fate cadere qualche goccia d'acqua per creare un po' di movimento, quindi posizionate la fustella "Blok build up cardshape die" sul cartoncino e fissatela con del washi tape così che resti in posizione durante il taglio.
Add some water splatters to the background, then place the "Blok build up cardshape die" onto the colored card stock with the help of some washi tape strips, and cut the elements.

Utilizzate lo stesso set di fustelle per tagliare la base della card nel cartoncino bianco ed incollatevi gli elementi corrispondenti dello sfondo. Quindi colorate il centro delle stelle con la penna gel bianca e aggiungete qui e là qualche stella.
With the same die cut out the base from another white card stock and glue on it the colored elements. Fill the centre of the stars with a white gel pen and add some stars here and there.

Praticate dei fori da 3 mm al centro delle stelle sul lato destro e nel cielo dove preferite (il numero dei fori in genere corrisponde a quello dei led del sistema di illuminazione).
Make a 1/8" hole in the centre of each stars on the right side and some others wherever you like (usually the same number of the leds). 

Girate la card sul retro e coprite i fori con dei quadratini di vellum incollandoli lungo il margine.
Turn the card base on the back side and place a piece of vellum on each hole.

Collocate ciascun led in corrispondenza dei buchi (potete tagliare quelli eccedenti), e fermateli con delle strisce di biadesivo (io ho incollato delle strisce di carta leggera per essere certa che l'adesivo tenesse nel tempo). A questo punto attaccate delle strisce di biadesivo spessorato lungo il perimetro.
Place one led on each hole (you can reduce the lenght of the led wire) and keep it in place with adhesive strips (I use light paper and glue to be sure that works well). Then add some strips of adhesive foam on the perimeter.

Tagliate un secondo pezzo di base nel cartoncino bianco, in modo da ricavare il pezzo che servirà a coprire i led. Ricordatevi di lasciare fuori il contenitore della batteria e di collocarlo attaccato al retro mediante una striscia di cartoncino lunga 8x5 cm e avvolta sul porta batteria.
With the base die cut a piece of card stock to cover the leds on the back of the card. Remember to leave out the battery holder and place it on the back inside a card stock case made by a strip 3"x2" long.

Per completare la card, tagliate due cerchi di 5 cm e sfumateli con lo stencil "Moon Mask" di Tim Holtz usando il Distress Ink Pumice Stone. Incollateli tra loro sul retro includendo anche un pezzetto di filo da pesca sottile che userete per agganciare la luna alla parte alta della card. Infine, stampate la scritta del set "How many nights moon flower" usando l'Archival Faded Jeans ed embossatelo con la polverina trasparente, quindi scontornatelo e incollatelo sulla parte in basso a sinistra della card usando il biadesivo spessorato. Due stelline del primo set di timbri embossate in oro, colorate in giallo con il pennarello Zig Lemon Yellow e scontornate, accompagnano la scritta sui lati, spessorate anche loro con il biadesivo.
Finita! Ora vi basta solo accenderla! ^_^

To complete the card, cut two 2" circles and blend each with the Tim Holtz "Moon Mask Stencil" by using the Distress Ink Pumice Stone and glue them together with a piece of thin fish wire inside, then bind the moon on the top of the card. At last, print the sentiment from the set "How many nights moon flower" with the Archival Faded Jeans and emboss it with the clear powder and place it on the down side by using adhesive foam. Add two stars embossed in gold and watercolored with Zig Clean Color Yellow marker. 
That's it: light on and enjoy! ^_^

Partecipate alla challenge per vincere un buono da $25 da spendere nel negozio di Simon Says Stamp!
Join the challenge and win a $25 gift voucher to Simon Says Stamp store!

Potete trovare tutti i prodotti che ho utilizzato nello store di Simon Says Stamp. Vi metto qui sotto la lista completa dei materiali.
You can find all the products I used in the Simon Says Stamp store. They are listed below.


Prodotti usati / Products used


sabato 31 dicembre 2022

Best Nine 2022


Ed anche quest'anno siamo arrivati al momento della classifica dei miei post che vi sono piaciuti di più su Instagram (escludendo i reel, che hanno sempre maggiori visualizzazioni). Cliccate su ciascuna foto per risalire al post originale.

Here we are with the "best nine" of the year based on the post you liked more on Instagram, excluding the reel. Click on each photo to open the original post.


Grazie per tutto l'entusiasmo e l'incoraggiamento con cui accogliete sempre i miei lavori. Restate sintonizzati perché ci saranno delle sorprese già all'inizio dell'anno 😉

I like to thank you for every enthusiastic comment and encouragement you wrote about my posts! Stay tuned because there will be surprises at the beginning of the new year already 😉

domenica 25 dicembre 2022

Pronti per la neve! / Ready for the snow!

 Auguri di Buon Natale a tutti! Anche da parte di Lella, preparatissima per un'eventuale nevicata ^_^


Prodotti utilizzati / Products used

venerdì 23 dicembre 2022

Yoga and chocolate

Lo sfondo delle card con i pupazzi di neve mi è piaciuto così tanto che ho deciso di replicarlo, ma questa volta il protagonista è il topino che fa yoga. In questa card mi sono divertita a mescolare diversi set di timbri, in modo da dare al topino un outfit adeguato alle temperature di stagione!

I loved so much the background colors of the snowmen cards, that I decided to do it again, but with the yogi mouse stamp as main character. I enjoyed mixing different stamp sets to give the mouse a proper outfit for these season temperatures!

Solo a guardarla questa card mi mette serenità 😊
Just looking at this card makes me calm and serene 😊

Colorazione / Coloring: Distress Oxide, Zig Clean Colors

domenica 18 dicembre 2022

Chiudipacco con baby snowman / Little snowman tags


Se vi sono piaciute le card del mio post precedente, non possono non piacervi questi piccoli chiudipacco con il dolcissimo baby snowman. Il procedimento è lo stesso delle card: sfondo con i Distress Oxide, fiocchi di neve embossati in bianco e protagonista stampato e fustellato comodamente a suo agio su una collinetta innevata. Procedimento non rapidissimo, ma preparandoli in serie guadagnerete un po' di tempo e farete un figurone.
If you liked the snowman cards in the previous post, you will love these tags with the sweet baby snowman. I proceeded in the same way: background blended with Distress Oxide, white embossed snowflakes and the little snowman cozy putted on the snow hill. Making these tags step by step will allow you to save some time.

Potete alternare i colori dello sfondo e dell'outfit, abbinandolo al destinatario del pacchetto.
You can change the colors of background and outfit to match the recipient of the present.


Qui potete vedere i miei chiudipacco abbinati a delle candide stelle all'uncinetto a sigillare i pacchetti con dolci pensieri per le mie colleghe Timbrine ^_^
Here you can see my tags with candid crocheted stars on the sweet presents I made for my colleagues of Impronte d'Autore shop ^_^

Colorazione / Coloring: Zig Clean Color Real Brushes, Distress Oxide, Prismacolors (Peach 939), White gel pen
Carta / Paper: Canson Montval 300g

domenica 11 dicembre 2022

Snowmen & tricks

Quante volte vi capita di sporcare il lavoro appena finito? O di sbavare durante la colorazione, per quanto siate attenti? A me spessissimo! Qualche volta in modo irrimediabile, altre recuperabile con qualche accorgimento, come nel caso delle due card di oggi. E il bello sapete qual è? Che probabilmente se non avessi macchiato i due pupazzi di neve non sarebbero nate queste due card, che io trovo deliziose!
(Per lo sfondo realizzato con i Distress Oxide mi sono ispirata alla bravissima Caly Person).
How many times did you stain a card you just finished? Or smudge the coloring? I do it so often! Sometimes it's an irreparable mistake, others it is manageable with the help of some experience. Well, these cards I am presenting you today, they have been managed. And the better part of this story is that if I didn't ruined the snowmen in the first place, maybe these cards would have never be done. And I love how they came out!
(My backgrounds were inspired by the talented Caly Person).

Ecco i miei snowmen disastrati: a sinistra macchiato da ditate, a destra con il colore sbavato per l'eccessiva umidità del pennello. Il guaio è che il rosso non perdona, quindi le soluzioni erano due: buttare via tutto o coprire. Per fortuna ho dato retta ai consigli che mi avete dato sulle storie di IG :D
These are the snowmen ruined in the first place: a partial red fingerprint on the left and too much water in the brush on the right. And red, you know, it's an unforgivable color. So, I had two options: the bin or cover the damages. Luckily I followed the hints you gave me on my IG story :D


Timbri / Stamps: Snowman & Friends, Polar Bear
Colorazione / Coloring: Zig Clean Color Real Brushes, Distress Oxide, Prismacolors (Peach 939), white gel pen
Carta / Paper: Canson Montval 300g

giovedì 8 dicembre 2022

Indovina il regalo / Guess the present

Siete alla caccia dei regali per Natale? Bob è già pronto! Chissà cosa avrà messo sotto l'albero... 😁
Are you looking for Christmas presents? Bob is ready to go! I wonder what he put under the tree... 😁


Materiale utilizzato / Supplies

martedì 6 dicembre 2022

Lella canterina natalizia / Christmas singing Lella

Che festa sarebbe senza canti? Anche Lella è della stessa idea e mette tutto l'impegno nella sua carola di Natale!
It's not Christmas without carols! Lella knows it and she puts all herself singing under the snow.

La base della card è tagliata con il rettangolo scallop da 14,2 cm. Lo sfondo della card è realizzato sfumando i Distress Oxide Squeezed Lemonade e Kitsch Flamingo, mentre la scritta è embossata con la polvere bianca. Per rendere tutto l'impegno di Lella nel canto, la testa è tagliata in un ovale lungo 3 cm le orecchie sono state sostituite da due zampe, mentre la bocca aperta è resa con un piccolo ovale nero. Le sfumature del vello sono fatte con il Distress Oxide Pumice Stone.
Il palo della lanterna è stato raccorciato (di 1 cm circa) nel centro per entrare nel rettangolo della card.
Per il brano occorre tagliare un rettangolo di 4x2 cm da una carta patterned con scritte o note e arrotolare l'estremità superiore. Per attaccarlo sulla pancia di Lella utilizzate un pezzetto di biadesivo spessorato.

I cut the card base with the 14,2 cm scallop rectangle die. I colored the background by blending the Distress Oxide Squeezed Lemonade and Kitsch Flamingo, then I embossed the date with white powder. Lella's head is cut from a white oval 3 cm long and the ears are made by two legs; the mouth is a little black oval. I blended the white edge of Lella's body with Distress Oxide Pumice Stone.
I cut a little bit (about 1 cm) the lantern pole in the middle to fit it in the card. To make the paper with the lyrics, you have to cut a 4x2 cm rectangle of patterned paper and roll a bit the upper edge, then attach it on Lella's belly with foam adhesive.


 Materiale utilizzato / Supplies

sabato 3 dicembre 2022

Un orsetto sognatore / A dreaming little bear


Un altro sfondo con aurora boreale, lo so. Giuro che prima o poi la smetto!! 😁
Another background with Northern Lights, I know. I'm addicted! 😁

Timbri / Stamps: Polar Bear, Christmas Mice
Colorazione / Coloring: Distress Oxide, Zig Clean Color Real Brush, Gouache, Gel pen
Carta / Paper: Canson Montval

giovedì 1 dicembre 2022

Una poinsettia sotto la neve / A poinsettia under the snow

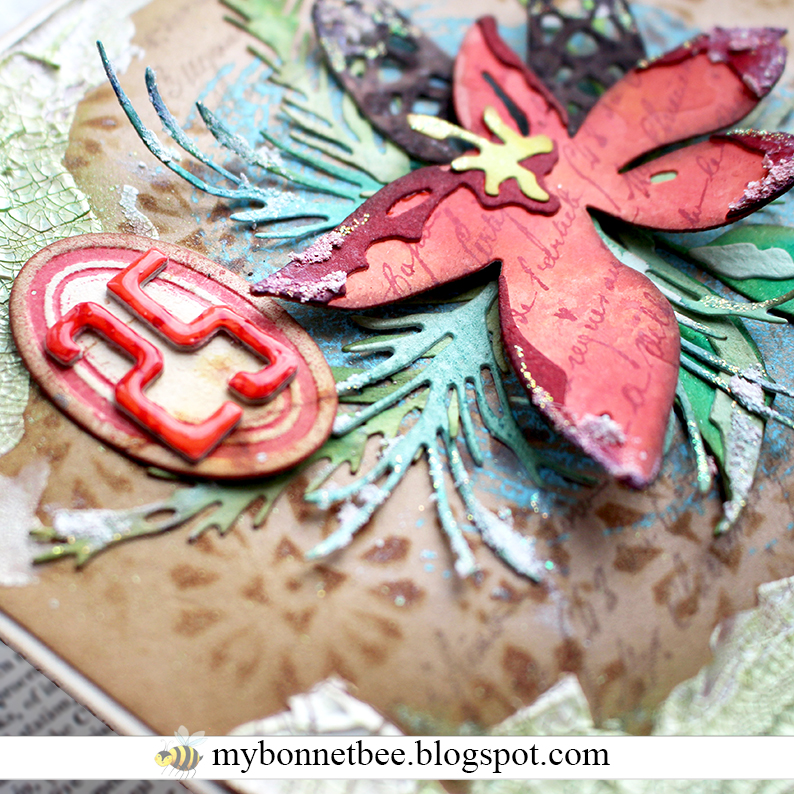
Siamo già a dicembre, sembra incredibile! La card di oggi è in pieno mood natalizio e mi ha permesso di pasticciare con un po' di prodotti nuovi che non avevo ancora avuto modo di provare (lo sapete, ogni tanto il mio lato mixed media si risveglia!😄)

I cannot believe we are in December already! The card I like to share today is a Christmas one, of course, and it allowed me to play with some new products I didn't find time to test yet (you know, sometime my mixed media side pops up! 😄)

Protagonista tra tutte, la nuova fustella della Stella di Natale di Tim Holtz (splendida!).
Ora vi racconto il procedimento: come prima cosa ho stampato il timbro del set Exquisite e sfumato lo stencil Rosette Layering in Vintage Photo sul cartoncino craft, quindi ho usato il tampone Distress Oxide Savaged Patina per il timbro pieno centrale del set Brushstrokes. Poi ho aggiunto la Distress Texture Paste Crackle agli angoli e, una volta asciutta, ho spruzzato un po' di Distress Mica Stain Wicked Elixir (dal vivo la brillantezza è fantastica!). Infine ho attaccato tutti gli elementi fustellati precedentemente stampati (la Poinsettia e i numeri con la scritta del set Faded Type) e colorati con i Distress. Tocco finale la Distress Grit Paste per l'effetto neve sulle foglie, del Glossy Accents sul 25 per un tocco di luce e qualche brillantino.
Vi lascio qualche scatto dei particolari qui sotto e i link ai materiali in calce.

The main character of this card is the beautiful Poinsettia die by Tim Holtz.
To make this card: first I printed the stamp from Exquisite set and blended the Rosette Layering Stencil by using the Vintage Photo Distress Ink onto the craft cardstock; then, I printed the stamp from Brushstrokes set by using the Distress Oxide Savaged Patina pad. I added some Distress Texture Paste Crackle on the corners and, after it dried, I sprayed some Distress Mica Stain Wicked Elixir on it (I love the shining of this ink!). At last I glued all the colored elements (I stamped the Poinsettia and the numbers with Faded Type stamp and red ink). The last touch was a little bit of Distress Grit Paste on the leaves, the Glossy Accents on the 25 to give it some light and some glitters.
You can find a few details and the links to the products below.


I'm in the Designer Spotlight for the Freezing Cold Challenge with this card!


LinkWithin

Related Posts Plugin for WordPress, Blogger...